How To Join Pond Liners Together: DIY Attachment Tips
Creating a pond in your backyard can be a fulfilling project, but ensuring your pond liner is properly installed is crucial to its longevity and functionality. Often, joining pond liners together is necessary to accommodate larger or irregularly shaped ponds.
Whether you’re extending an existing pond or starting from scratch, here are some essential DIY attachment tips to help you join pond liners effectively:
1. Choosing the Right Pond Liner Material
Before you begin joining pond liners, ensure you have the right materials. Pond liners come in various materials such as EPDM rubber, PVC, and HDPE. EPDM rubber liners are popular due to their flexibility and durability, especially for DIY projects. Ensure the liner material you choose is compatible with the adhesive or tape you plan to use for joining.
2. Gather Necessary Tools and Materials
- Pond Liner: Ensure you have enough liner to cover your pond area, accounting for overlaps.
- Seaming Tape or Adhesive: Choose a high-quality seaming tape or adhesive specifically designed for pond liners. This ensures a strong, waterproof seal.
- Utility Knife or Scissors: For cutting the liner and tape/adhesive application.
- Roller or J-roller: Used to ensure proper adhesion of the seaming tape.
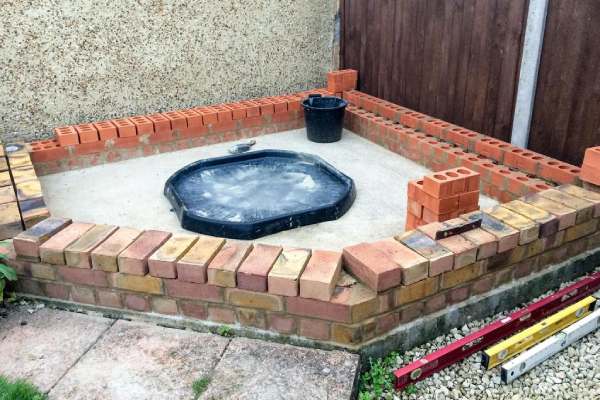
3. Preparing the Pond Liners
- Measure and Cut: Measure the area where the pond liner needs to be joined. Leave a sufficient overlap (usually recommended overlap is 6-12 inches) to ensure a secure seal.
- Clean the Surface: Ensure both surfaces to be joined are clean, dry, and free from debris. Any dirt or moisture can compromise the adhesion of the seaming tape or adhesive.
4. Using Seaming Tape
- Apply Adhesive: Follow the manufacturer’s instructions for applying the adhesive or primer (if required) to the edges of the pond liners that need to be joined.
- Place Seaming Tape: Carefully position the seaming tape over the seam, ensuring it overlaps both pieces of liner evenly.
- Press and Seal: Use a roller or J-roller to firmly press down on the seaming tape, ensuring a tight bond. Pay extra attention to corners and edges to prevent any potential leaks.
5. Using Adhesive
- Apply Adhesive: Apply the adhesive evenly to one side of the pond liner seam according to the manufacturer’s instructions.
- Press Together: Carefully bring the two sides of the pond liner together, ensuring the adhesive makes full contact. Use a roller to press down firmly along the seam to achieve a strong bond.
- Allow Proper Cure Time: Adhesive typically requires a curing time as per the manufacturer’s guidelines before filling the pond with water.
6. Testing the Seal
- Fill the Pond: Once the adhesive or seaming tape has cured completely, fill the pond with water gradually.
- Inspect for Leaks: Monitor the pond for any signs of leaking around the joined area. Address any leaks promptly by applying additional adhesive or seaming tape as needed.
7. Additional Tips
- Overlap Considerations: Ensure the overlap between pond liners is sufficient and consistent to prevent potential weak spots.
- Weather Conditions: Perform the joining process in dry weather conditions to ensure proper adhesion and sealing.
- Professional Consultation: For larger or more complex pond projects, consider consulting a professional to ensure the job is done correctly.
Creating a pond can significantly enhance your outdoor space, providing a tranquil environment for plants, fish, and relaxation. By following these DIY attachment tips for joining pond liners together, you can ensure your pond is durable, functional, and a source of enjoyment for years to come.
![How To Stop Your Pond From Overflowing [Pond Overflow Fix]](https://pondmemo.com/wp-content/uploads/2023/05/how-to-stop-your-pond-from-overflowing-1-img.jpg)
![How To Fix Pond Liner To Wood [Step-By-Step Guide]](https://pondmemo.com/wp-content/uploads/2023/05/how-to-fix-pond-liner-to-wood-1_img-min.jpg)
![6 Cheapest Substrates for a Planted Aquarium [2024]](https://pondmemo.com/wp-content/uploads/2024/01/cheapest-substrate-for-planted-aquarium-IMG_1.jpg)